
Hey there lovely creator!💕
YES YOU! YOU are the creator of so many things. I have the pleasure of working with so many different people and one thing many of them have had in common is the dreaded misconception that they are not good enough, “I’m just not creative” or “I can’t even draw a stick figure”. The truth is you are good enough and YOU ARE CREATIVE, we all are!
Each and every day you create something, whether it be a delicious meal or batch of cookies for your family, putting together that snazzy outfit you feel great in, or working on a business plan, creating solutions at work, dancing to your favorite music, and even creating a post on Facebook. Literally everything you do throughout your day and your life you are creating, taking your ideas and bringing them to existence.
So please realize that not only are you creative but your a unique creative being that has the ability to tap into your very own special brand of creative genius!!! Don’t hold back, let it shine! Let yourself SHINE!!!
In case you don’t already know I am artist April Small and I am a long time acrylic paint class instructor and certified Master life Coach/Therapeutic Art Life Coach who you can connect with directly on Facebook . I love to bring people and communities together to get creative and particularly LOVE helping individuals like you to find your creative path. Each and every one of us has their own unique creative voice and I feel as though it is my special place her on earth to help others tap into that innate creative being that is often lying dormant deep within you. We as humans have a strong desire to take our ideas and see them into existence, we find so much pleasure and joy in the creative process and build confidence and self-esteem when we see the results of our efforts. Check my business page Odonata Artistic Services for my upcoming in person or virtual classes and workshops or join my group Creating HeART to further develop your creative habit.
This week we are shaking things up! I absolutely LOVE the knowledge I gained experimenting with fluid art these last two weeks, if you haven’t already check out Part 1 and Part 2 of Paint pouring with me. Although there is so many more techniques to explore and things to learn about this beautiful artform I was getting a pull to do something a little different this week, resin art, and I am so excited to say it was a blast!
💧What Is Resin And Resin Art
So resin is a mixture of organic compounds that under the right circumstances will harden.
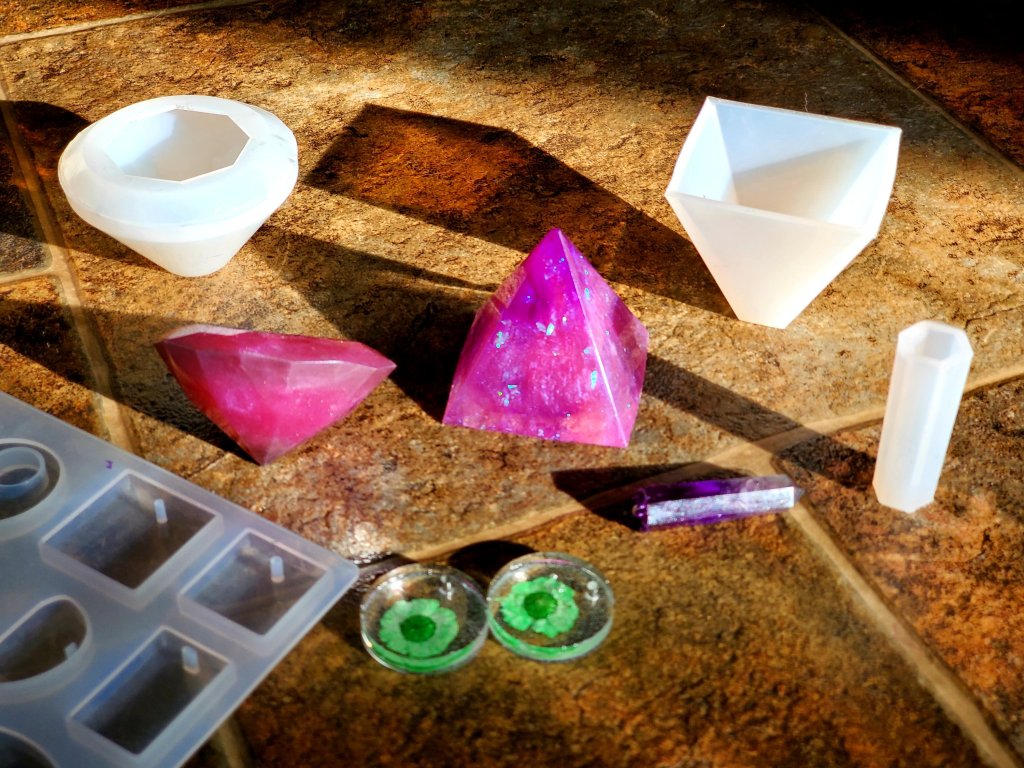
Resin Art is basically another fun science experiment that you can play around and manipulate to create your very own unique creations. There are many ways to use resin in your art and we are going to explore a few of them but this week I am specifically using my resin and silicone molds to create some fun pieces. I made some jewelry for myself and some cute little trinkets for my daughter Lillian to play with.
What We Can’t Fix We Learn From – All Helpful Tips
Before I even get in to the step-by-step I want to show you what I’ve learned so that you can have the most fun and success during your creative time!
The way I look at and encourage you to do the same is there is no failure, there’s only opportunities to learn and further develop. This can be applied to all areas of your life and another great reason to have a creative practice. This is a safe place for you to explore something new, push yourself out of your comfort zone and get comfortable with expressing yourself.

So I learned from the diamond mold the importance of making sure to get out any little air pockets that might be tapped. Using a toothpick, or heating up your resin. I did get a few of the bubbles but as you can see in this picture a couple were left in the corners.
I also got worried about over pouring so I under poured, during the drying process there can be some shrinkage and you want to account for that. That made the top of my diamond have a sunken in space which was disappointing BUT I think it can be fixed!
👉I will report back when I attempt it this week, I am thinking I may add a dried flower detail and pour a small amount of resin to fill in the space. Mistakes like these shouldn’t be seen as a set back but an OPERTUNITY. When I took the diamond out from the mold and I immediately thought how cool would it be if we added something in the middle! So here it is, proof that imperfection does not have to be seen as failure.
Little bubbles throughout the resin was also an issue for the earrings I had made. After doing some research I found out that I can get rid of most bubbles like this be heating the resin a little.💕
👩🏭You can use a torch like we did in our resin pouring last week (basically just hover over the resin that you poured into a mold with the torch but doesn’t get to close and continuously move so that you are not burning the resin or your mold)
💧You can use warm water, simply place the cup of mixed resin into a bowl of warm water so that it warms the resin without the resin getting mixed with the water.
⏰You can also just mix your resin and then simply wait for the bubbles to come up, maybe a half hour or so but this did not work very well for me with the earrings so ill be trying warm water or a torch next time I practice.
⚠️Be Careful During The Removal Process

Another great opportunity to share with you what I learned is this, be carful removing your smaller creations. The small narrow size of this pendent I created made for a really difficult task getting out of the silicone mold. I do know now that had I squeezed the end of the mold at the point of the pendant it might have come out without breaking. I tried first to roll the mold down but the very end would not come out. DO NOT PULL! Because I had some small pieces of amethyst in the bottom half of the pendent it weakened the point so when it was pull on it unfortunately did break. So just be real carful especially when you have any weakened spots in your creation. The larger molds had no issue for the most part you do not really need to worry.
Of course this was totally fixable! A small amount of super glue, you’d never know anything even happened!
So lets do this!🎉
🛠Materials
Resin
Here’s a great resin option, from what I’ve heard some of the lower quality readings might have a yellowish tint to them. If your coloring the resin it might not be a big deal but I know from experience this particular brand was crystal clear. 🔮
📏Measuring Cups
Super important, must have accurate measuring cups. I highly recommend you use either disposable or silicone ones because the resin will ruin your regular measuring cup. Silicone ones are great you first let the resin dry and pop it out when it’s done and your silicone measuring cup is ready to be used again. 👍
🪄Mixing and Other Helpful Tools
Popsicle sticks or something else you can mix with, toothpicks, disposable liquid droppers are also super helpful! Anything you can throw away after it’s good, they do also have silicone options as well.
🌈Coloring And Decorating
Dye and mica powder are great ways to add color to your resin. Bothe bring a little something different. The color can be cool because you add just a drop or two and get a translucent coloring to your resin, the more dye drops you add the deeper the color gets (a little does go a long way, try just one drop at a time!). The mica powder can add sparkle and a opaque coloring to your resin (meaning you wont be able to see through).
Sparkles, dried flowers and other found things are awesome for resin! If you are using objects in your resin you DO NOT WANT TO USE MICA POWDER or very little dye because you wont be able to see the objects. Although we can get in to how to layer our resin molds which would allow you to have sections of both clear and colored parts of your mold but we are going to KISS Keep it simple!
Coverage
Cover your surfaces a plastic table cover works great! Also helps to have a plastic basin to put the stuff like your silicone measuring cups in to dry after use.
Step-By-Step
1️⃣First you will need to decide what molds you are using. This will help you determine roughly how much resin you will need to do your project. I picked a couple knowing that this was going to be kind of messy and I was going to want to experiment with them.
2️⃣Once you have an idea on what your doing you will mix your resin with the resin hardener (be careful to follow the directions on measurements, I believe most our 1:1 ratio but just in case please check the directions that came with your resin). Your better to have a little extra than not mixing enough. You also need to make sure your measuring out the two liquids EVENLY. Absolute must for resin to dry correctly they must be accurately measured. I did not have that issue this time but if they are not equal parts it will lead to it not hardening properly. Once measured you’ll use a mixer and stir the combination for 3-5 minutes until any streaking disappears.
🚨HELPDFUL TIP ALERT🚨
Lets go over bubbles in the resin again, just in case you missed this section above. You can sit the resin filled cup in a bowl of hot water to get the bubbles out, DO NOT SUBMERGE you don’t want the water and resin to mix. Or you can wait a half hour or so for the bubbles to rise on their own, or after pouring the resin in the mold you could apply heat with a torch lighter hovering over the mold and moving in a circular motion by just don’t burn your creation!
3️⃣Now its time for the fun part! Add in any dyes, mica powder, and sparkles can be added now. I tried a little bit of everything, add one at a time see how it looks and decide when your ready to pour into the mold.
Since I wanted to use multiple colors I took the already mixed resin and poured whatever amount I thought I needed into separate plastic cups and by separating them like this I was able to experiment with my dye and mica powders creatine different combinations to play around with.
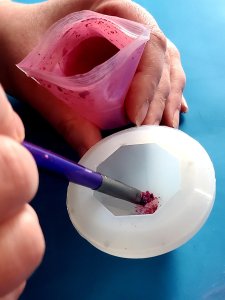
👉BEFORE you fill the mold you can also use the dry mica powder to color the outside of your creation. Just apply the mica powder to the inside of the mold in the places you wish to color using a paint brush.
4️⃣After you fill your mold you can add any other objects, as the resin is drying you may have to peak in on them every so often and use a toothpick to put things back into the position you wanted them. I did find that I had to reposition the dried flowers once, I did that around the 4 hour mark. Once I sis the adjustment I checked back at 6 hours and from then on they had stayed in place. Drying time took about 24 hours.
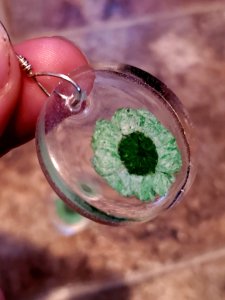
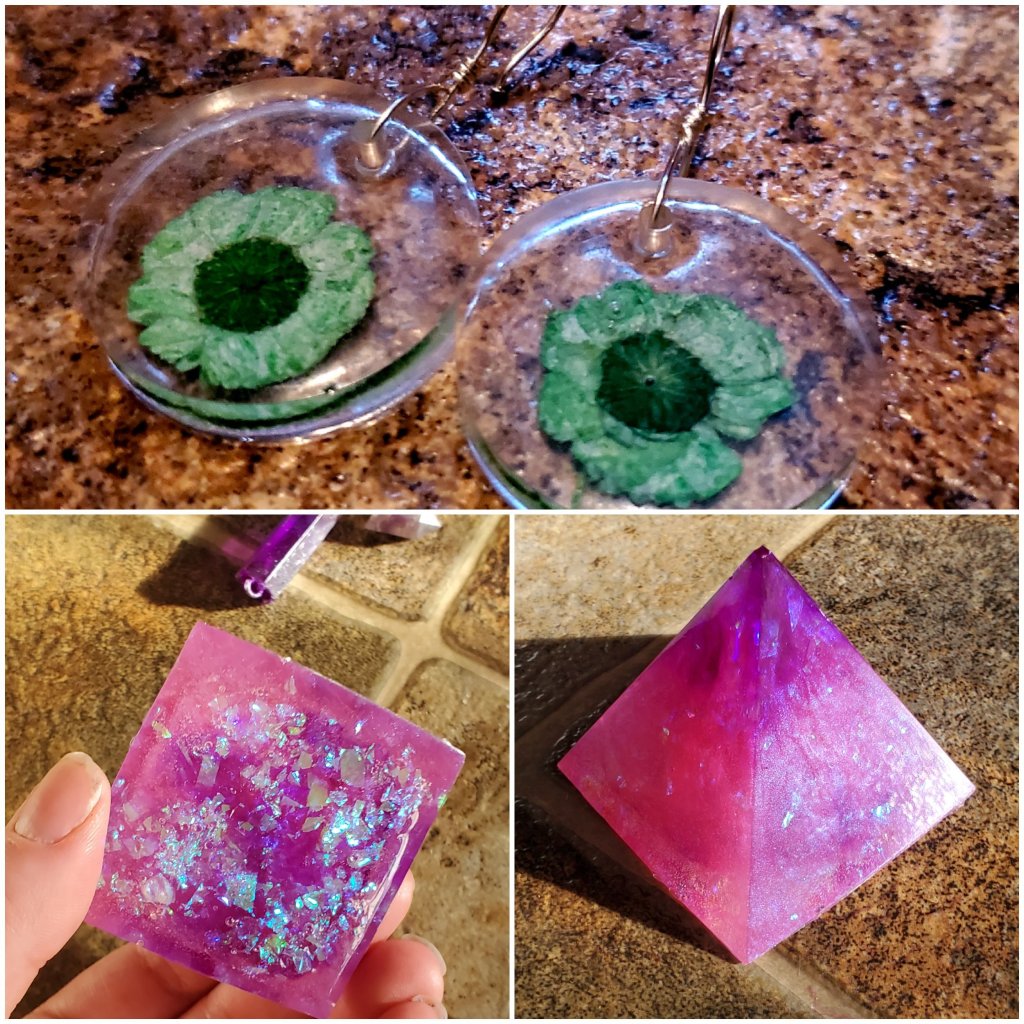
If you look at the picture of my finished projects bellow you can see I made the pink diamond and the purple pendant. I used what was leftover of the purple and poured it into the pyramid giving the tip of the pyramid a purple hue and then poured the rest of the pink to fill the mold. I also added some sparkles to the bottom. The earrings I just did a clear resin and added two dried flowers.
👉Once you have completed your project I really hope🤞🤞🤞 you share how it went and what you came up with! Please feel free to comment below and/or on Facebook (OdonataByAS) and Instagram (OdonataArtisticServices) I am here if you have an questions or run in to any issues during the process and will get back to you as quickly as I can within my ability to do so.
💓Sending lots of love to you and best wishes on your magical creative journey,
Artist and friend April Small💕
